
Help for Remote-RED for Node-RED
Everything you need to set up Remote-RED in Node-RED: from the Node-RED node to troubleshooting.
Set up Node-RED nodes
Installation
First, install Remote-RED in Node-RED. Use "Manage Palette" within the Node-RED editor and install the package node-red-contrib-remote.
Access node
The access node allows you to access a website locally or remotely from the app. Usually this is your dashboard or a page of the UI Builder.
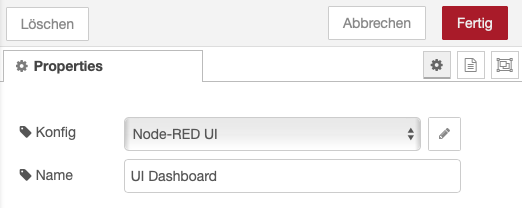
Create a node of type "remote access" for each page you want to access. Besides the name, this node contains only one config node. The configuration is outsourced to the config node, as these settings are also used for other functions like push notifications.
Config node
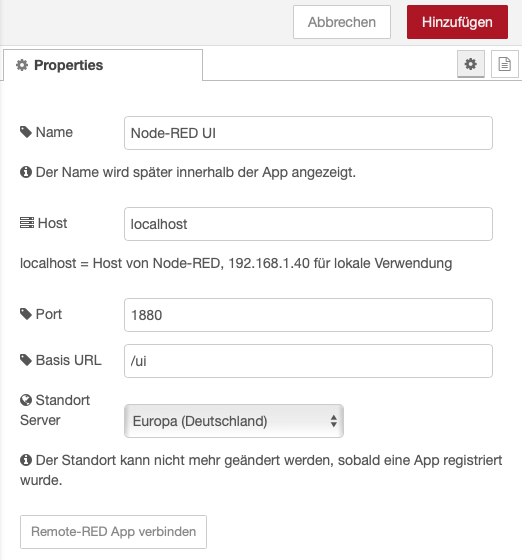
For each access node you create a corresponding config node. In this config node you define with which host, port and URL the connection will be established. The default values show the dashboard as an example. It is also possible to configure other pages from the local network, as long as the Node-RED server can access them.
Name: With this title the page will be displayed later in the app.
Serving Host: The local IP of the host whose website is to be shared. "localhost" uses the Node-RED server on which the access node is running.
Protocol: The protocol used by the web server. For Node-RED this is normally http, but can be changed to https via settings.js.
Serving Port: The port that will be forwarded. For Node-RED this is usually 1880, for other websites usually 80.
Base URL: The initial page to be called.
You can only edit the "Server location" once. Here you specify in which corner of the world the server is located, which is used for routing your website. For the fastest connection, choose the location closest to you.
Once you have defined these settings and installed the iOS or Android app, you can connect an app by clicking the "Connect Remote-RED App" button. More about this in the "Install and connect app" section.
Notification node
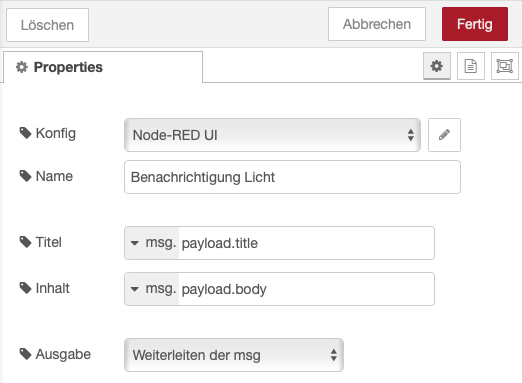
With this node you can send a push notification to the devices connected to the selected config node. Select a config node that you already use in an access node. You can use the same config node in several notification nodes.
Configure the title and text of the notification. The default values assume that the payload of the incoming message contains the strings "title" and "body". You can also enter fixed texts or use flow or global variables.
Whenever a message arrives at the notification node, a notification is sent to your devices.
Question node
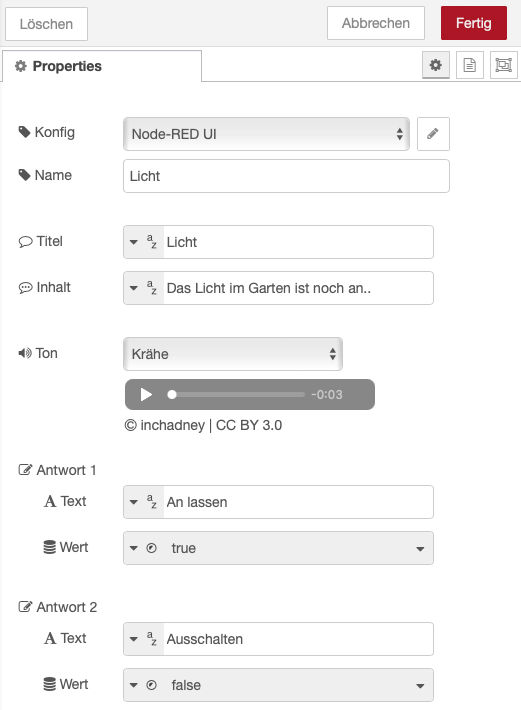
With this node you can send a question via push notification to the devices connected to the selected config node. Select a config node that you already use in an access node. You can use the same config node in several question nodes.
It's important that the config node points to your local Node-RED computer and that an access node is active with it. The base URL is irrelevant here.
Configure the title and text of the notification. The default values assume that the payload of the incoming message contains the strings "title" and "body". You can also enter fixed texts or use flow or global variables.
You can specify up to three answers. The text of the answers can be entered directly as a string or taken from the incoming message. If the text is empty, the answer is not displayed. Use the value to specify what the node outputs in msg.payload when this answer is selected.
Whenever a message arrives at the question node, a notification is sent to your devices.
Install and connect app
Install app
You can install the apps from the Apple App Store or the Google Play Store. The app will ask for permission to send you push notifications after the first start. Allow this if you want to use the notification function.
Instances
Within the app, the term Node-RED instance is used repeatedly. An instance is the connection to a config node in Node-RED. Within the app you can add multiple instances, i.e. local pages.
As long as the app isn't connected to at least one config node, there isn't much you can do with it.
Connect app
Connecting transfers certificates for accessing your local site to the app.
Open the config node you want to connect in Node-RED. Press the "Connect Remote-RED App" button. The config node now connects to one of the Remote-RED servers and shortly after displays a QR code.
Within the app, use the "Connect Node-RED Instance" function and scan the QR code. The app should now be connected. To connect other apps (e.g. on another phone), press the button again to generate another QR code.
It's very important that you leave the config node with "Add" or "Update" and then save the changes with "Deploy".
If you can't scan a QR code, you can also use the link below the QR code. Open it on your phone, which opens the app and connects the instance.
Changing the configuration of an instance
If changes are necessary, you can make them within the config node in Node-RED. After making the changes, you must activate them with a redeploy. You can then update the instance in the app by pulling the list of instances down.
Deleting an instance from the app
In iOS and iPadOS, delete an instance by swiping from right to left. On Android, long-press the name of the instance.
Advanced functions
Geofencing
Using geofencing, Node-RED can be informed when you leave or enter defined areas. To do this, open the options within the Remote-RED app and go to "Manage geofences". A list of existing geofences may be displayed, which you can edit here. Use "Add geofence" to create a new one.
The name of the geofence will later be output in Node-RED. A geofence in Remote-RED is always a circle around a coordinate, whose radius can be configured. To set the coordinate, tap on the map. Entering and leaving the geofence is then sent to the selected instance.
Within Node-RED, the Remote-RED access node has a corresponding "geofence output" which is used to output the changes.
Note for Android: Another app such as Maps has to actively update the location for a geofence to be triggered.
iOS Shortcuts
Using a shortcut, Node-RED actions can be executed directly from the iOS home screen or via Siri voice command. To do this, create the corresponding shortcuts in the Apple "Shortcuts" app. Select Remote-RED for an action under "Apps", then select "Execute action". The first two fields (action and value) are simply passed as text to the selected Node-RED instance and can be evaluated there, e.g. via a Switch node.
Within Node-RED, the Remote-RED access node has a corresponding "action output" which is used to output the actions.
Example: I create two shortcuts to switch a light via MQTT. For the shortcut "Light on" I specify the action "LIGHT" and the value "ON"; for the second shortcut "Light off" I use the action "LIGHT" and the value "OFF". In Node-RED, a Switch node sits behind the "action output", evaluating the JSON parameter "action" and passing everything matching "LIGHT" to a Function node. This changes the payload of the message so that only the JSON parameter "value" (ON/OFF) remains as payload, and passes it on to the corresponding MQTT out.
As an additional function, you can query Node-RED variables via "Determine Context" and use them within your shortcuts.
Android Widget
An Android widget offers roughly the same functions as the iOS shortcuts. One or more widgets can be added to the home screen, and you can freely choose the size. The small gear icon at the bottom right takes you to the widget's configuration.
Add one or more actions to the widget. Tapping an action opens the edit dialog. Give the action a name that will be displayed in the widget. The two fields Action and Value are simply passed as text to the selected Node-RED instance and can be evaluated there, e.g. via a Switch node. See the example above under "iOS Shortcuts". Select the instance the action will be sent to. Under "Style" you can add some color, and "New Row" lets you define how many actions are displayed next to each other in the widget.
Troubleshooting
Network Error inside Node-RED
The computer on which the Remote-RED access node is installed within Node-RED naturally needs internet access. If you get a "Network Error" when connecting an app, your Node-RED machine most likely can't reach our servers. If you use a firewall, the addresses in the table below must be allowed for your server location.
DNS: DNS is needed to resolve the hostnames of our servers. If your firewall restricts outgoing traffic, you need to open almost all outgoing ports (53, 853 and everything above 1023) to your DNS server.
America (USA)
| Zweck | Port | Ziele |
|---|---|---|
| Adding new instances | 443 | contact-us.remote-red.com · 5.161.113.250 · 2a01:4ff:f0:c185::1 |
| API communication | 443 | api-nodered03.remote-red.com · 5.161.113.250 · 2a01:4ff:f0:c185::1 |
| SSH tunnel | 22 | proxy-nodered03.remote-red.com · 5.161.113.250 · 2a01:4ff:f0:c185::1 |
Europe (Germany)
| Zweck | Port | Ziele |
|---|---|---|
| Adding new instances | 443 | contact-de.remote-red.com · 49.13.208.138 & 49.12.191.168 · 2a01:4f8:c012:caae::1 & 2a01:4f8:c013:5d65::1 |
| API communication | 443 | api-nodered02.remote-red.com · 49.13.208.138 · 2a01:4f8:c012:caae::1 |
| API communication | 443 | api-nodered04.remote-red.com · 49.12.191.168 · 2a01:4f8:c013:5d65::1 |
| SSH tunnel | 22 | proxy-nodered02.remote-red.com · 49.13.208.138 · 2a01:4f8:c012:caae::1 |
| SSH tunnel | 22 | proxy-nodered04.remote-red.com · 49.12.191.168 · 2a01:4f8:c013:5d65::1 |
Asia (Singapore)
| Zweck | Port | Ziele |
|---|---|---|
| Adding new instances | 443 | contact-sg.remote-red.com · 194.233.74.204 · 2407:3640:3009:6554::1 |
| API communication | 443 | api-nodered05.remote-red.com · 194.233.74.204 · 2407:3640:3009:6554::1 |
| SSH tunnel | 22 | proxy-nodered05.remote-red.com · 194.233.74.204 · 2407:3640:3009:6554::1 |